Volume 4 - Year 2017 - Pages 1 - 10
DOI: 10.11159/ijmem.2017.001
Optimization of Spheroidized Process Parameters for Two AISI 1022 Steel Wires Using Taguchi Approach
Chih-Cheng Yang1, Chang-Lun Liu2
1Kao Yuan University, Department of Mechanical and Automation Engineering
1821 Chung-Shan Road, Lu-Chu, Kaohsiung 82151, Taiwan, R.O.C.
T30043@cc.kyu.edu.tw
2Kao Yuan University, Graduate School of Fasteners Industry Technology
1821 Chung-Shan Road, Lu-Chu, Kaohsiung 82151, Taiwan, R.O.C.
Ching0608s@yahoo.com.tw
Abstract - Steel wire coils are used as semi-finished products for the production of fastener billets. The process usually requires preliminarily drawing wire coil to reduce the diameter of products. The drawn wire usually has to be annealed to improve the cold formability. In the fastener industry, most companies use a subcritical process for spheroidized annealing. The quality of spheroidize annealed steel wire affects the forming quality of screws. Various parameters affect the quality of spheroidized annealing such as spheroidized annealing temperature, prolonged heating time, furnace cooling time and flow rate of nitrogen. The effects of spheroidized annealing parameters affect the quality characteristics of wires, such as tensile strength and hardness. In this study, a series of experimental tests are carried out and Taguchi method is used to obtain optimum spheroidized annealing conditions to improve the mechanical properties of two AISI 1022 low carbon steel wires, WA and WB. It is revealed experimentally that, for wire WA, spheroidized annealing temperature and prolonged heating time are the significant factors; however, for wire WB, spheroidized annealing temperature and furnace cooling time are the significant factors to influence the mechanical properties of steel wires.
Keywords: Fastener industry, Spheroidized annealing, Forming quality, Tensile strength, Taguchi method.
© Copyright 2017 Authors - This is an Open Access article published under the Creative Commons Attribution License terms. Unrestricted use, distribution, and reproduction in any medium are permitted, provided the original work is properly cited.
Date Received: 2016-07-09
Date Accepted: 2017-01-10
Date Published: 2017-07-14
1. Introduction
The manufacturing processes of fasteners generally include wire-manufacturing, forming, heat treating, coating. A cold-heading-quality alloy steel rod is used to manufacture wire for cold heading. Generally, the wire that is spheroidizing-annealed-in-process is produced by drawing wire coil into wire, followed by heat treatment, cleaning and coating, and then a final drawing operation for cold forming. A cold heading quality AISI 1022 steel wire is widely used to manufacture self-drilling screw and tapping screw.
For wire-manufacturers, some companies simply purchase steel wires, cold reduce, and spheroidize them before selling to bolt manufacturers; some companies are bolt manufacturers who spheroidize the wires themselves before cold heading. Most companies were using a subcritical process by simply prolonged holding at a temperature just below Ae1 [1].
Spheroidizing provides the needed ductility for cold heading [1]. Spheroidization of cementite lamellae through spheroidize annealing improve the ductility of steel [2]-[4]. Rad-Con Inc. (Cleveland, OH, USA) provided a spheroidized annealing process that produced steel wire with little or no decarbonization under completely computerized control [2]. O’Brien and Hosford [5] investigated spheroidization of medium carbon steels, AISI 1541 and AISI 4037, used in the bolt industry with two process cycles, intercritical cycle and subcritical cycle. Das et al. [6] studied a cold heading quality steel wire obtained from two different sources, which are used for manufacturing one automobile fastener. Both wires are spheroidize annealed and phosphate coated. The microstructures, compositions, and mechanical properties were evaluated to establish the characteristics of a good stock wire that can improve the tool life leading to higher productivity and product quality. The spheroidizing treatment consumes the most time of bolt manufacture. Commercial spheroidization of coils usually takes many hours.
Taguchi method is a quality improvement technique that uses experimental design methods for efficient characterization of a product or process, combined with a statistical analysis of its variability with the fact that pre-production experiments, properly designed and analyzed, can significantly contribute to efforts towards the accurate characterization and optimization of industrial processes, the quality improvement of products, and the reduction of costs and waste [7]. For heat treatment of steel, many studies proposed the use of Taguchi’s parameter design to obtain optimum condition with minimum number of experimental and lower cost [8]-[13]. A series of experimental tests on AISI 1022 low carbon steel wire were carried out and Taguchi method is used to obtain optimum spheroidized annealing conditions to improve the mechanical properties of steel wires for cold forming [13] and, with the new spheroidizing parameter settings, the performance measures were effectively improved over their value at the original settings.
The quality of spheroidize annealed wire affects the forming quality of screws. Various parameters affect the quality of spheroidized annealing such as spheroidized annealing temperature, prolonged heating time, furnace cooling time and flow rate of nitrogen (protective atmosphere). The effects of spheroidized annealing parameters affect the quality characteristics of wires, such as tensile strength and hardness.
In this study, based on the prior study [13], Taguchi method is used to optimize spheroidized annealing conditions to improve the mechanical properties of two AISI 1022 low carbon steel wires, which are obtained from two sources identified as WA (f5.5mm) [13] and WB (f6.5mm). The quality of wire WA is better than wire WB, while wire WB is cheaper. Before cold heading, both of these wires are spheroidizing annealed after drawing wire coil to the same wire size with section-area reductions of about 60% for wire WA and 70% for wire WB, respectively.
2. Optimal Experiment Design
Two AISI 1022 low carbon steel wires are investigated in this study. Their chemical compositions are listed in Table 1. A subcritical process is used for spheroidized annealing of the steel wires, prolonged holding at a temperature just below Ae1, then cooling in the furnace, the procedure as shown in Figure 1.
Table 1. Chemical composition of AISI 1022 low carbon steel wires (wt.%).
| Wire | C | Mn | P | S | Si | Ni | Cr | Cu | Ti | Al |
| WA [13] | 0.22 | 0.76-0.77 | 0.012-0.013 | 0.002-0.008 | 0.02-0.04 | 0.01-0.03 | 0.04 | 0.01-0.08 | - | 0.030-0.034 |
| WB | 0.19-0.22 | 0.73-0.79 | 0.012-0.029 | 0.003-0.010 | 0.03-0.07 | 0.00-0.01 | - | 0.01-0.02 | 0.0570-0.0754 | 0.0291-0.0494 |
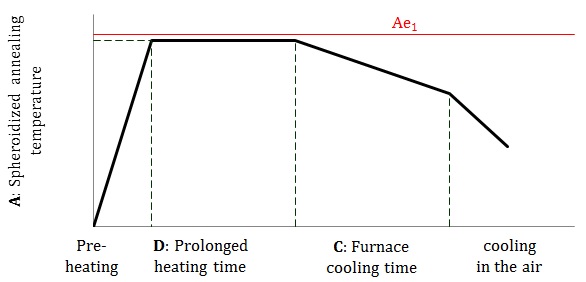
Four process parameters with three levels listed in Table 2 are selected as the experimental factors. Every factor has three levels to spheroidize wires to evaluate the mechanical properties of wires. The parameters of Level 2 were the original spheroidized annealing process parameters for wires WA and WB. That is, with 10 m3/hr nitrogen to prevent decarbonization under completely computerized control, the steel wire coils were heated in the furnace to 700 °C just below Ae1, holding and prolonged 7.5 hours, then cooling in the furnace for 8.0 hours.
Taguchi method allows the changing of many factors at the same time in a systematic way, ensuring the reliable and independent study of the factors’ effects. The orthogonal array table, L9(34), is used as an experimental design for these four factors [14], as listed in Table 3.
Spheroidizing provides the needed ductility for cold heading. Through spheroidized annealing, the ductility of steel wire may be improved, and the hardness may be reduced as well. When the hardness is reduced to improve the ductility of the steel wire through spheroidized annealing, the strength of the steel wire is simultaneously decreased. However, a given strength of the annealing steel wire has to be provided for cold heading. Therefore, the tensile strength of the steel wire is the main quality characteristic, with a target value of 383 MPa, which is assigned by the company. Each test result, including ten specimens, followed by each fabricated process and transformed to S/N ratio (signal to noise ratio). The S/N ratio for the nominal-the-best response is [14].

wherem is mean of each test result, m is target value, and S is standard deviation. The tensile tests are conducted on a 30 ton universal testing machine under a constant ram speed of 25 mm/min. The dimensions of the tensile specimen are f3.5mm × L300mm.
Table 2. Experimental factors and their levels for L9 orthogonal array.
| Factor | Level 1 | Level 2 | Level 3 | |
| A | Spheroidized annealing temperature (°C) | 695 | 700 | 705 |
| B | Flow rate of nitrogen (m3/hr) | 5 | 10 | 15 |
| C | Furnace cooling time (hr) | 7.5 | 8.0 | 8.5 |
| D | Prolonged heating time (hr) | 7 | 7.5 | 8 |
Table 3. L9(34) orthogonal array experimental parameter assignment.
| Exp. No. | A: Spheroidized annealing temperature (°C) | B: Flow rate of nitrogen (m3/hr) | C: Furnace cooling time (hr) | D: Prolonged heating time (hr) |
| L1 | 695 | 5 | 7.5 | 7.0 |
| L2 | 695 | 10 | 8.0 | 7.5 |
| L3 | 695 | 15 | 8.5 | 8.0 |
| L4 | 700 | 5 | 8.0 | 8.0 |
| L5 | 700 | 10 | 8.5 | 7.0 |
| L6 | 700 | 15 | 7.5 | 7.5 |
| L7 | 705 | 5 | 8.5 | 7.5 |
| L8 | 705 | 10 | 7.5 | 8.0 |
| L9 | 705 | 15 | 8.0 | 7.0 |
Analysis of variance (ANOVA) is an effective method to determine the significant factors and the optimal fabrication conditions to obtain optimal quality. For Taguchi method, the experimental error is evaluated with ANOVA to carry out the significance test of factors. The nature of interaction between factors is considered as experimental error [14]. As the effect of a factor in comparison to the experimental error is sufficiently large, it is identified a significant factor. The confidence level of a factor is evaluated with experimental error to identify the significant factor influenced the material property of spheroidized annealing wire.
3. Results and Discussion
For the drawn steel wire, which is not yet spheroidized annealed, the tensile strength and hardness are 822MPa and 285HV for wire WA [13], and 759MPa and 263HV for wire WB, due to heavy plastic work. Spheroidizing is the process of producing a microstructure in which the cementite is in a spheroidal distribution. The globular structure improves the formability of steel wires. When the wire is fabricated following the original spheroidized annealing process conditions (level 2 in Table 2), the mean tensile strength and mean hardness are 388.7MPa and 141.3HV for wire WA [13], and 376.8MPa and 138.8HV for wire WB. They are about half of the non-spheroidized wires.
The experiment results of the tensile strength and hardness (mean, μ; standard deviation, S; and S/N ratio) are shown in Tables 4 [13] and 5 respectively for wires WA and WB. The mean tensile strength varies from 372.0 to 407.0 MPa for wire WA (Table 4a), and varies from 370.4 to 419.9 MPa for wire WB (Table 5a). The deviations of the test results for wire WA are obviously smaller than wire WB. For wire WA, the mean tensile strengths of tests L2, L3 and L7 are smaller than the target value, as shown in Table 4a. While for wire WB, almost all the mean tensile strengths of tests (L2, L4~L9) are smaller than the target value, as shown in Table 5a.
The mean hardness varies from 134.0 to 147.7HV for wire WA (Table 4b), and varies from 127.8 to 155.0HV for wire WB (Table 5b). The deviations of the test results for wire WA are similar to wire WB. For wire WA, the mean hardness of tests L2, L3 and L8 are smaller than the value at the original settings, as shown in Table 4b. While for wire WB, the mean hardness of tests L4, L6 and L9 are smaller than the value at the original settings, as shown in Table 5b. The properties of spheroidizing annealed steel wires are obviously altered with various spheroidized annealing process conditions.
Table 4. The experimental results for wire WA [13]. (a) Tensile strength; (b) Hardness.
(a)
| Exp. No.* | T1 | T2 | T3 | T4 | T5 | T6 | T7 | T8 | T9 | T10 | μ(MPa) | S | S/N Ratio |
| L1 | 417 | 409 | 362 | 387 | 417 | 407 | 403 | 398 | 400 | 376 | 397.6 | 16.96 | −27.10 |
| L2 | 365 | 370 | 374 | 359 | 380 | 387 | 398 | 340 | 382 | 335 | 368.9 | 18.93 | −27.38 |
| L3 | 411 | 379 | 381 | 365 | 367 | 360 | 365 | 367 | 372 | 354 | 372.0 | 15.02 | −25.29 |
| L4 | 388 | 415 | 409 | 413 | 398 | 366 | 385 | 403 | 400 | 390 | 396.8 | 14.18 | −26.06 |
| L5 | 400 | 373 | 385 | 386 | 414 | 382 | 397 | 412 | 409 | 432 | 398.9 | 17.16 | −27.48 |
| L6 | 381 | 415 | 427 | 411 | 417 | 413 | 407 | 413 | 398 | 388 | 407.0 | 13.24 | −28.88 |
| L7 | 377 | 369 | 375 | 391 | 356 | 374 | 381 | 377 | 387 | 394 | 378.1 | 10.68 | −21.28 |
| L8 | 376 | 384 | 388 | 387 | 393 | 401 | 399 | 393 | 391 | 378 | 389.1 | 8.00 | −20.25 |
| L9 | 394 | 386 | 374 | 392 | 382 | 412 | 400 | 392 | 378 | 398 | 390.8 | 10.90 | −22.71 |
(b)
| Exp. No.* | T1 | T2 | T3 | T4 | T5 | T6 | T7 | T8 | T9 | T10 | μ (HV) | S |
| L1 | 147 | 145 | 147 | 148 | 148 | 144 | 152 | 154 | 155 | 137 | 147.7 | 4.98 |
| L2 | 153 | 136 | 135 | 145 | 151 | 137 | 133 | 137 | 136 | 135 | 139.8 | 6.81 |
| L3 | 138 | 136 | 144 | 146 | 145 | 144 | 135 | 149 | 142 | 133 | 141.2 | 5.08 |
| L4 | 148 | 145 | 148 | 143 | 147 | 150 | 148 | 146 | 137 | 143 | 145.5 | 3.56 |
| L5 | 141 | 132 | 144 | 140 | 142 | 161 | 139 | 142 | 137 | 138 | 141.6 | 7.20 |
| L6 | 141 | 147 | 149 | 143 | 147 | 143 | 148 | 144 | 146 | 155 | 146.3 | 3.77 |
| L7 | 151 | 141 | 147 | 144 | 137 | 143 | 142 | 154 | 135 | 138 | 143.2 | 5.76 |
| L8 | 138 | 133 | 135 | 131 | 139 | 134 | 138 | 133 | 126 | 133 | 134.0 | 3.66 |
| L9 | 146 | 147 | 148 | 146 | 145 | 136 | 148 | 142 | 139 | 144.1 | 3.78 |
*: Experimental conditions as defined in Table 3; μ: mean value of test results.
Table 5. The experimental results for wire WB. (a) Tensile strength; (b) Hardness.
(a)
| Exp. No.* | T1 | T2 | T3 | T4 | T5 | T6 | T7 | T8 | T9 | T10 | μ(MPa) | S | S/N Ratio |
| L1 | 363 | 393 | 420 | 377 | 438 | 447 | 429 | 438 | 400 | 417 | 412.1 | 26.55 | -31.98 |
| L2 | 365 | 370 | 374 | 359 | 380 | 387 | 398 | 340 | 382 | 335 | 368.9 | 18.93 | -27.38 |
| L3 | 447 | 435 | 433 | 420 | 430 | 363 | 418 | 392 | 429 | 433 | 419.9 | 23.38 | -32.87 |
| L4 | 384 | 380 | 370 | 361 | 371 | 357 | 366 | 363 | 374 | 380 | 370.4 | 8.35 | -23.38 |
| L5 | 346 | 414 | 397 | 372 | 387 | 395 | 368 | 439 | 343 | 351 | 381.3 | 29.45 | -29.39 |
| L6 | 390 | 371 | 389 | 385 | 379 | 356 | 347 | 382 | 340 | 337 | 367.7 | 19.52 | -27.80 |
| L7 | 366 | 373 | 343 | 399 | 372 | 401 | 369 | 354 | 342 | 408 | 372.8 | 22.27 | -27.72 |
| L8 | 389 | 335 | 403 | 357 | 379 | 337 | 354 | 395 | 369 | 381 | 369.9 | 22.47 | -28.23 |
| L9 | 367 | 362 | 364 | 358 | 388 | 379 | 363 | 370 | 372 | 351 | 367.4 | 10.04 | -25.21 |
(b)
| Exp. No.* | T1 | T2 | T3 | T4 | T5 | T6 | T7 | T8 | T9 | T10 | μ (HV) | S |
| L1 | 141 | 142 | 140 | 151 | 142 | 149 | 148 | 142 | 146 | 141 | 144.2 | 3.74 |
| L2 | 153 | 136 | 135 | 145 | 151 | 137 | 133 | 137 | 136 | 135 | 139.8 | 6.81 |
| L3 | 153 | 160 | 165 | 156 | 155 | 162 | 152 | 154 | 146 | 147 | 155.0 | 5.78 |
| L4 | 137 | 130 | 126 | 123 | 125 | 129 | 127 | 126 | 130 | 125 | 127.8 | 3.76 |
| L5 | 148 | 146 | 144 | 145 | 146 | 143 | 154 | 151 | 146 | 149 | 147.2 | 3.19 |
| L6 | 137 | 129 | 140 | 139 | 138 | 134 | 137 | 131 | 144 | 140 | 136.9 | 4.25 |
| L7 | 150 | 149 | 146 | 148 | 154 | 161 | 147 | 159 | 163 | 151 | 152.8 | 5.83 |
| L8 | 148 | 137 | 156 | 158 | 150 | 139 | 141 | 138 | 156 | 139 | 146.2 | 7.95 |
| L9 | 136 | 132 | 121 | 133 | 132 | 129 | 136 | 144 | 128 | 133 | 132.4 | 5.68 |
*: Experimental conditions as defined in Table 3; μ: mean value of test results.
3. 1. Wire WA
To obtain optimum quality, analysis of variance (ANOVA) is an effective method to determine significant factors and optimum fabrication conditions. The confidence levels listed in Table 6 may identify the significant factor influenced the tensile strength of wire WA. The contribution of a factor is the percentage of sum of square (SS), that is, the percentage of the factor variance to the total quality loss [14]. The effect of a factor may be pooled to error if its confidence level or contribution is relatively small. For S/N ratio, as shown in Table 6b [13], the contribution of spheroidized annealing temperature (A) is 87.0% of the total variation, which is the highest contributor to the variability of the experimental results. The contribution of prolonged heating time (D) is 10.2%, which is the second highest contribution. However, the factors of the furnace cooling time (C) and the flow rate of nitrogen (B) are not significant for the S/N ratio because their contributions are relatively small. With pooling of errors, the confidence levels are 99.9% and 95.4% respectively for spheroidized annealing temperature (A) and prolonged heating time (D), Therefore, both factors, especially the spheroidized annealing temperature, are significant which may be used to decrease the variance [14]. The factor of furnace cooling time (C) is not significant for S/N ratio, but is significant (100% confidence level) for quality characteristic, as shown in Table 6a, which may be used as an adjustment factor. The factor of flow rate of nitrogen (B) is not significant for either S/N ratio or quality characteristic, which may be used to reduce the cost.
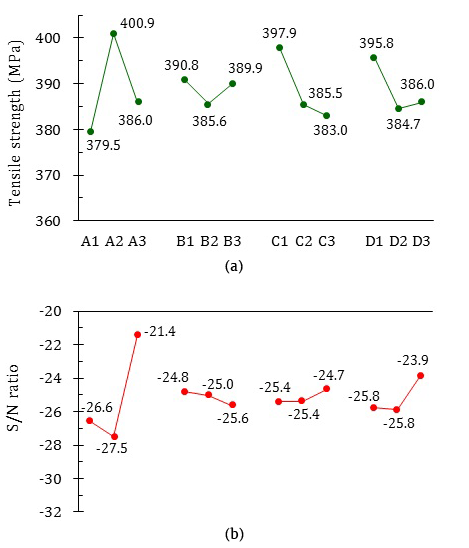
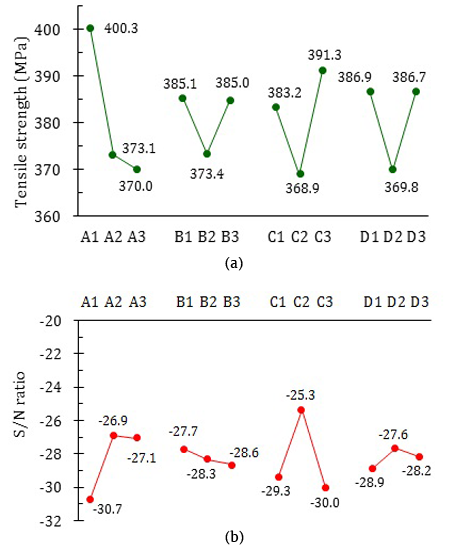
Figure 2 illustrated the factor response diagrams and the level averages of four factors with respect to the quality characteristic and S/N ratio. For each factor, the effect is the range of the level averages. For S/N ratio, the maximum level average is the optimum level [7][14]. It is revealed that, for the four factors, most of the level averages are larger than the target value, as shown in Figure 2a; and the original levels (Level 2), as shown in Figure 2b [13], are not the optimum fabricating parameters to obtain the target tensile strength for wire WA. Obviously for the significant factors, spheroidized annealing temperature (A) and prolonged heating time (D), the optimum conditions are respectively A3 (spheroidized annealing temperature, 705 °C), D3 (prolonged heating time, 8 hr). For the other two factors, flow rate of nitrogen (B) and furnace cooling time (C), their effects of S/N ratios are relatively small, as shown in Figure 2b [13]. The effect of quality characteristic of flow rate of nitrogen (B), as shown in Figure 2a, is relatively small, too, which can be a factor to reduce the cost, therefore, B1 (flow rate of nitrogen, 5 m3/hr) is chosen as the optimum condition. However, the effect of quality characteristic of furnace cooling time (C) is obviously important, as shown in Figure 2a, which may be a adjustment factor, and C2 (furnace cooling time, 8 hr) is chosen as the optimum condition.
Table 6. Variance analysis table for wire WA. (a) Quality characteristic; (b) S/N ratios [13].
(a)
| Factor | SS | DOF | Var | F | Confidence | Contribution |
| A | 7,234 | 2 | 3,617 | 15.9 | 100.0% | 22.5% |
| B | 471 | 2 | 235 | 1.0 | 64.1% | 1.5% |
| C | 3,823 | 2 | 1,911 | 8.4 | 100.0% | 11.9% |
| D | 2,216 | 2 | 1,108 | 4.9 | 99.0% | 6.9% |
| Error | 18,395 | 81 | 227 | Sexp = 15.1 | ||
| Total | 32,139 | 89 | *At least 99.0% confidence level | |||
Pooling of errors
| Factor | SS | DOF | Var | F | Confidence | Significance |
| A | 7,234 | 2 | 3,617 | 15.9 | 100.0% | Yes |
| B | Pooled | |||||
| C | 3,823 | 2 | 1,911 | 8.4 | 100.0% | Yes |
| D | 2,216 | 2 | 1,108 | 4.9 | 99.0% | Yes |
| Error | 18,866 | 83 | 227 | Sexp = 15.1 | ||
| Total | 32,139 | 89 | *At least 99.0% confidence level | |||
(b)
| Factor | SS | DOF | Var | Contribution |
| A | 64.3 | 2 | 32.13 | 87.0% |
| B | 1.1 | 2 | 0.53 | 1.4% |
| C | 1.0 | 2 | 0.51 | 1.4% |
| D | 7.5 | 2 | 3.77 | 10.2% |
| Total | 73.9 | 8 | 100.0% | |
Pooling of errors
| Factor | SS | DOF | Var | F | Confidence | Significance |
| A | 64.3 | 2 | 32.13 | 62.1 | 99.9% | Yes |
| B | Pooled | |||||
| C | Pooled | |||||
| D | 7.5 | 2 | 3.77 | 7.3 | 95.4% | Yes |
| Error | 2.1 | 4 | 0.52 | Sexp = 0.72 | ||
| Total | 73.9 | 8 | *At least 95.0% confidence level | |||
SS: sum of square; DOF: degree of freedom; Var: variance; F: F-test; Sexp: experimental error.
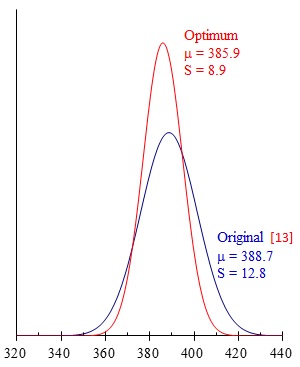
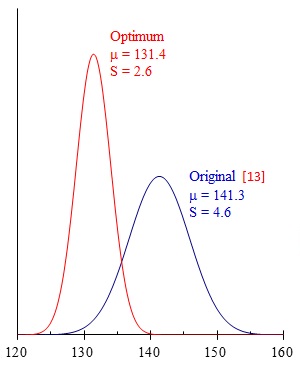
In order to confirm the robust design of results, wire WA was fabricated followed the optimum levels: A3, B1, C2 and D3. Figure 3 shows the original (using level 2s in Table 2) and optimum probability distributions respectively for tensile strength and hardness of wire WA. As comparing with the original results, the optimum mean of tensile strength is 385.9 MPa, which is closer to the target value, and the deviation decreases about 30.6%. The optimum mean hardness of 131.4 HV is obviously decreased compared to the original mean hardness of 141.3 HV, as shown in Figure 3b, and also the deviation decreases about 43.5% compared to the original result. The new parameter settings evidently improve the performance measures, such as ductility and strength, over their value at the original settings. The optimum result improve the ductility and the strength of wire WA, and so the formability is effectively improved.
(a)
(b)
3.2. Wire WB
With analysis of variance (ANOVA), the confidence levels listed in Table 7 identify the significant factor influenced the tensile strength of wire WB. For S/N ratio, the contribution of furnace cooling time (C) is 54.3% of the total variation, which is the highest contributor to the variability of the experimental results. The contribution of spheroidized annealing temperature (A) is 40.6%, which is the second highest contribution. With pooling of errors, the confidence levels are 98.7% and 99.3% respectively for spheroidized annealing temperature (A) and furnace cooling time (C), as shown in Table 7(b).
Therefore, both factors are significant which may be used to decrease the variance [14]. The factor of prolonged heating time (D) is not significant for S/N ratio, but is significant (99.5% confidence level) for quality characteristic, as shown in Table 7a, which may be used as an adjustment factor. The factor of flow rate of nitrogen (B) is not significant for either S/N ratio or quality characteristic, which may be used to reduce the cost.
Table 7. Variance analysis table for wire WB. (a) Quality characteristic; (b) S/N ratios.
(a)
| Factor | SS | DOF | Var | F | Confidence | Contribution |
| A | 16,612 | 2 | 8,306 | 16.7 | 100.0% | 22.7% |
| B | 2,726 | 2 | 1,363 | 2.7 | 92.9% | 3.7% |
| C | 7,745 | 2 | 3,873 | 7.8 | 99.9% | 10.6% |
| D | 5,828 | 2 | 2,914 | 5.9 | 99.6% | 8.0% |
| Error | 40,294 | 81 | 497 | Sexp = 22.3 | ||
| Total | 73,205 | 89 | *At least 99.0% confidence level | |||
Pooling of errors
| Factor | SS | DOF | Var | F | Confidence | Significance |
| A | 16,612 | 2 | 8,306 | 16.0 | 100.0% | Yes |
| B | Pooled | |||||
| C | 7,745 | 2 | 3,873 | 7.5 | 99.9% | Yes |
| D | 5,828 | 2 | 2,914 | 5.6 | 99.5% | Yes |
| Error | 43,020 | 83 | 518 | Sexp = 22.8 | ||
| Total | 73,205 | 89 | *At least 99.0% confidence level | |||
(b)
| Factor | SS | DOF | Var | Contribution |
| A | 28.7 | 2 | 14.4 | 40.6% |
| B | 1.4 | 2 | 0.7 | 1.9% |
| C | 38.4 | 2 | 19.2 | 54.3% |
| D | 2.3 | 2 | 1.1 | 3.2% |
| Total | 70.7 | 8 | 100.0% | |
Pooling of errors
| Factor | SS | DOF | Var | F | Confidence | Significance |
| A | 28.7 | 2 | 14.4 | 15.8 | 98.7% | Yes |
| B | Pooled | |||||
| C | 38.4 | 2 | 19.2 | 21.1 | 99.3% | Yes |
| D | Pooled | |||||
| Error | 3.6 | 4 | 0.9 | Sexp = 0.95 | ||
| Total | 70.7 | 8 | *At least 95.0% confidence level | |||
SS: sum of square; DOF: degree of freedom; Var: variance; F: F-test; Sexp: experimental error.
Figure 4 presented the factor response diagrams of four factors respectively respected to quality characteristic and S/N ratio. It is revealed that, almost half of the level averages are smaller than the target value, as shown in Figure 4a; and the original levels, except flow rate of nitrogen (B), are the optimum fabricating parameters to obtain the target tensile strength for wire WB. For the significant factors, spheroidized annealing temperature (A) and furnace cooling time (C), the optimum conditions are respectively A2 (spheroidized annealing temperature, 700 °C), C2 (furnace cooling time, 8 hr). For the other two factors, flow rate of nitrogen (B) and prolonged heating time (D), their effects of S/N ratios are relatively small, as shown in Figure 4b. The effect of quality characteristic of flow rate of nitrogen (B), as shown in Figure 4a, is relatively small, too, which can be a factor to reduce the cost, therefore, B1 (flow rate of nitrogen, 5 m3/hr) is chosen as the optimum condition. However, the effect of quality characteristic of prolonged heating time (D) is relatively important, which can be a adjustment factor, and D2 (prolonged heating time, 7.5 hr) is chosen as the optimum condition.
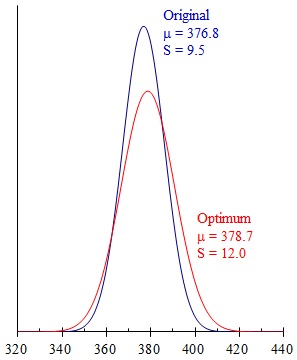
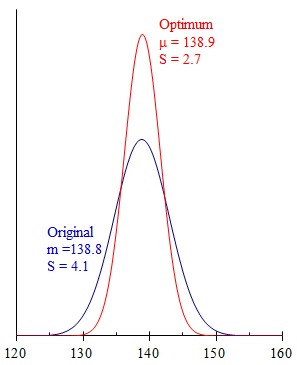
To confirm the robust design of results, wire WB was fabricated followed the optimum levels: A2, B1, C2 and D2. Figure 5 shows the original (using level 2s in Table 2) and optimum probability distributions respectively for tensile strength and hardness of wire WB. As comparing with the original results, the optimum mean of tensile strength is 378.7 MPa, which is smaller than the target tensile strength, while the deviation increases about 26.9%. The optimum mean hardness of 138.9 HV is not decreased but almost the same as the original mean hardness of 138.8 HV, as shown in Figure 5b, although the deviation decreases about 34.8% compared to the original result. The new parameter settings obviously do not improve the ductility of wire WB. The quality of strength is neither improved because of the increase of deviation. Therefore, the formability of wire WB is not improved through this optimum operation.
Through the optimization in spheroidized annealing of two AISI 1022 steel wires, WA and WB, both of the mean tensile strengths are close to the target tensile strength, and the quality is improved for wire WA, but not for wire WB. The mean hardness is decreased for wire WA, and the quality is improved, so the formability is improved as well. However, for wire WB, instead of decreasing, the mean hardness is greater than wire WA, therefore, the formability of wire WB is not improved. This result is due to the composition of titanium in wire WB, as listed in Table 1, since adding 0.015wt% titanium could increase the hardenability of steel [15] and may cause excess inclusion to damage the surface quality and to reduce the formability [16].
4. Materials and Methods
In this study, the wires are spheroidizing annealed after drawing AISI 1022 steel wire coils WA (Φ5.5mm) and WB (Φ6.5mm) to a specific size (Φ3.5mm) with section-area reductions of about 60% for wire WA and 70% for wire WB, respectively. The steel wire coil WA is manufactured (Φ5.5mm, Al-killed) by China Steel Corporation, Kaohsiung, Taiwan [13]; and wire coil WB is manufactured (Φ6.5mm, hot rolled wire rod for cold heading) by Jiangsu Yonggang Group Co., Ltd., Jiangsu, China. Their chemical compositions are listed in Table 1. The steel wires are spheroidizing annealed, procedures as shown in Figure 1, with CCP-2820 pit type annealing furnace (Tainan Chin Chang Electrical Co., Ltd., Tainan, Taiwan). Taguchi method allows the changing of many factors at the same time in a systematic way. The orthogonal array table, L9(34), is used as an experimental design for the factors [14], as listed in Table 3.
5. Conclusion
The quality of spheroidize annealed steel wire affects the forming quality of screws. Four factors affect the quality of spheroidized annealing such as spheroidized annealing temperature, prolonged heating time, furnace cooling time and flow rate of nitrogen (protective atmosphere). The effects of spheroidized annealing parameters affect the quality characteristics of wires, such as tensile strength and hardness. In this study, Taguchi method is used to obtain optimum spheroidized annealing conditions to improve the mechanical properties of two AISI 1022 low carbon steel wires, WA and WB. Since a given strength of the annealing steel wire has to be provided for cold heading, the tensile strength is the main quality characteristic of spheroidized annealedsteel wire, with a target value of 383MPa. It is revealed experimentally that, for wire WA, the spheroidized annealing temperature (A) and the prolonged heating time (D) are the significant factors; the determined levels are Level 3 for the spheroidized annealing temperature (705 °C, A3), Level 3 for the prolonged heating time (8 hr, D3), Level 2 for the furnace cooling time (8 hr, C2), and Level 1 for the flow rate of nitrogen (5 m3/hr, B1). The optimum mean tensile strength is 385.9 MPa, and the optimum mean hardness is 131.4 HV. The new spheroidizing parameter settings evidently improve the performance measures over their values at the original settings. The formability of steel wire WA is effectively improved. For wire WB, the spheroidized annealing temperature (A) and the furnace cooling time (C) are the significant factors; the determined levels are Level 2 for the spheroidized annealing temperature (700 °C, A2), Level 2 for the prolonged heating time (7.5 hr, D2), Level 2 for the furnace cooling time (8 hr, C2), and Level 1 for the flow rate of nitrogen (5 m3/hr, B1). The optimum mean tensile strength is 378.7 MPa, and the optimum mean hardness is 138.9 HV. However, the qualities of mechanical properties are not evidently improved through this optimum operation, neither the formability, which may be due to the composition of titanium. These results may be used as a reference for wire-manufacturers.
Acknowledgements
The authors would like to acknowledge the Ministry of Science and Technology of the Republic of China (Taiwan, R.O.C.) for their support of this research under grant MOST 105-2632-E-244-001, and the support of Homn Reen Enterprise CO., LTD., Taiwan for providing the materials and apparatus to carry out the spheroidized annealing experimental work.
References
[1] B. L. Bramfitt and A. K. Hingwe, “Annealing of steel,” in Heat treating, vol. 4, ASM International: Materials Park, OH, USA, 2011.
[2] R. Hill, “Annealing: The First Step in Cold Forming,” in Wire Journal International, vol. 17, no. 7, pp. 95-97, 1984.
[3] P. L. Ebner, “Heat Treating Cold-Heading Wire in High-Convective Bell Annealers,” in Wire World International, vol. 29, pp. 88-90, 1987.
[4] J. Dhers, B. Thivard, and A. Genta, “Improvement of Steel Wire for Cold Heading,” in Wire Journal International, vol. 25, no. 10, pp. 73-76, 1992.
[5] James M. O’Brien and William F. Hosford, “Spheroidization cycles for medium carbon steels,” in Metallurgical and Materials Transactions A, vol. 33, no. 4, pp. 1255-1261, 2002. View Article
[6] T. Das, J. Y. Li, M. Painter and E. Summerville, “Evaluation of two AISI 4037 cold heading quality steel wires for improved tool life and product quality,” in Journal of Materials Engineering and Performance, vol. 11, no. 1, pp. 86-91, 2002. View Article
[7] N. Logothetis, Managing for Total Quality: From Deming to Taguchi and SPC, Prentice Hall International: London, UK, 1992. View Article
[8] A. Kamyabi-Gol and M. Sheikh-Amiri, “Spheroidizing Kinetics and Optimization of Heat Treatment Parameters in CK60 Steel Using Taguchi Robust Design,” in Journal of Iron and Steel Research, International, vol. 17, no. 4, pp. 45-52, 2010. View Article
[9] V. K. Murugan and P. Koshy Mathews, “Optimization of Heat Treatment Processes Using Taguchi’s Parameter Design Approach,” in International Journal of Research in Mechanical Engineering, vol. 1, no. 1, pp. 16-21, 2013. View Article
[10] K. Palaniradja, N. Alagumurthi and V. Soundararajan, “Optimization of Process Variables in Gas Carburizing — An Experimental Investigation with AISI 3310 Steel Material,” in Materials and Manufacturing Processes, vol. 21, no. 1, pp. 111-113, 2006. View Article
[11] F. Ficici, M. Kapsiz and M. Durat, “Applications of Taguchi Design Method to Study Wear Behaviour of Boronized AISI 1040 Steel,” in International Journal of the Physical Sciences, vol. 6, no. 2, pp. 237-243, 2011. View Article
[12] O. S. Fatoba, O. L. Akanji, A. S. Aasa, “Optimization of Carburized UNS G10170 Steel Process Parameters Using Taguchi Approach and Response Surface Model (RSM),” in Journal of Minerals and Materials Characterization and Engineering, vol. 2, pp. 566-578, 2014. View Article
[13] C.-C. Yang and C.-L. Liu, “Improvement of the Mechanical Properties of 1022 Carbon Steel Coil by Using the Taguchi Method to Optimize Spheroidized Annealing Conditions,” Materials, vol. 9, no. 8, pp. 693, 2016. View Article
[14] H.-H. Lee, Taguchi Methods: Principles and Practices of Quality Design, Gau Lih Book Co. Ltd., Taiwan, 2008. (In Chinese)
[15] H.-L. Jin, A.-M. Zhao, Y.-L. Chen and J.-Y. Cheng, “Effect of Titanum on Microstructure and Properties of Hot Stamp-Formed Steel Containing Boron,” in Materials for Mechanical Engineering, vol. 36, no. 8, pp. 6-10, 2012. (In Chinese)
[16] C. M. Huang, “Effects of Titanium on the Properties of Antimicrobial Ferritic Stainless Steels,” Master dissertation, Department of Materials Science and Engineering, I-Shou University, Taiwan, 2003. (In Chinese)

